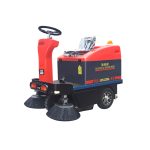
A ride-on parking lot sweeper is only “low labor” if it’s predictable. When dust control drops, brooms stop turning, or the machine starts vibrating, the cleanup window gets eaten by troubleshooting.
This guide is written for warehouse and plant operations managers who need reliable outdoor sweeping (loading areas, perimeter lanes, employee parking, yard entrances). It focuses on preventive maintenance and the most common failure modes—without assuming a specific brand or model.
Pro Tip: Treat sweeper maintenance like a small production line: standard checks, a short log, and a clear “stop and call service” rule. That’s how you keep uptime stable across shifts.
Ride-on parking lot sweeper troubleshooting: a safe triage flow
If a machine isn’t sweeping well, don’t jump straight to “it needs service.” Most issues fall into one of three buckets:
Airflow/dust control (filters, screens, seals, hoses)
Brush system (wear, adjustment, belt drive, entanglement)
Power/drive (battery/charging basics, breaker/fuse, belt/drive faults)
Start with low-risk, fast checks (hopper, screens, visible blockages) before you open guards or touch moving assemblies.
⚠️ Warning: Do not inspect or clear a fan/impeller area without isolating energy (key off, lockout/tagout). A rotating impeller can cause severe injury.
Start with a 10-minute pre-shift inspection
Do these checks before the first run of the day. They catch most “mystery” problems early.
Walkaround + safety: leaks, loose guards, unusual smells, damaged wiring, anything dragging.
Hopper status: confirm it’s empty enough for the run and the door seals look intact.
Filters and screens: verify the filter is seated and not packed; confirm screens aren’t blocked.
Brooms and skirts: look for obvious wear, bent bristles, or skirts that no longer seal near the ground.
Quick functional check: brooms engage, vacuum/collection engages, no unusual vibration.
If you only have time for one thing: cleanliness + airflow (hopper, screen, filters, seals). Airflow problems are the fastest path to poor pick-up and dust trails.
Parking lot sweeper maintenance schedule (daily to quarterly)
Intervals vary by model and debris type, but this cadence works as an operational baseline.
Interval | Focus | What “good” looks like |
|---|---|---|
Daily (end of shift) | Debris + airflow | Hopper emptied, screen clear, filters cleaned per manual, no caked dust |
Weekly | Wear + adjustment | Brooms adjusted, skirts seal reasonably, no tangled debris, belts look healthy |
Monthly | Inspection + lubrication | Bearings/hinges inspected, grease points addressed per manual, fasteners checked |
Quarterly (or seasonal) | Outdoor realities | Corrosion check, storage plan, water/spray system verified if used, deeper vacuum path inspection |
Two outdoor-specific realities to bake into your PM plan:
Wet debris (leaves, mulch, damp dust) clogs screens and hoses faster than dry debris.
Weather exposure accelerates corrosion, hardens seals, and turns “minor” electrical issues into intermittent faults.
For a practical reminder of why hopper cleanliness matters, Schwarze highlights daily hopper cleaning and related upkeep in “10 Sweeper Maintenance Tips”.
Parking lot sweeper dust control problems: diagnose airflow first
If the sweeper is leaving a dust trail or not picking up fines, treat it as an airflow problem until proven otherwise.
Parking lot sweeper filter cleaning (and what to check with it)
Likely causes
Filter clogged, incorrectly seated, or damaged
Hopper screen blocked (common after wet debris)
Skirts/seals not sealing near the ground
Hose leaks, loose connections, or blockages
Checks (low-risk first)
Empty the hopper and clean the screen.
Inspect the filter: is it packed, torn, or not seated? Clean/replace per your manual.
Inspect skirts/seals: look for gaps, tears, or hardened rubber.
Check the vacuum path: hoses for kinks, clogs, loose clamps.
OEM troubleshooting guides commonly put skirts/seals and vacuum-path checks near the top of “poor sweeping” diagnostics. See the symptom-to-cause structure in Tennant’s S20 basic troubleshooting guide (PDF).
Symptom: weak suction or inconsistent pick-up
Likely causes
Partial restriction (hose, cyclone, screen)
Door or duct seals leaking
Fan/impeller issue (debris buildup, damage)
Checks
Clear the easy restrictions first (screen, hoses) before you assume the fan is bad.
If you suspect the impeller, stop and follow your lockout/tagout procedure.
For vacuum-style sweepers, For Construction Pros emphasizes regular inspection and cleaning of the air path and impeller as part of reliable performance in “Extending the Life of Vacuum Sweepers Through Proper Maintenance” (see their guidance here).
Parking lot sweeper broom adjustment: restore sweep quality without burning brush life
Outdoor sweeping adds abrasive dust, sand, and small gravel. That accelerates broom wear and changes the contact pattern.
Symptom: debris left in a stripe or streaks
Likely causes
Main broom worn unevenly
Main broom height/contact pattern incorrect
Skirts are leaking, allowing debris to escape the sweep path
Checks
Inspect bristles for flat spots and uneven wear.
Adjust the broom to the correct contact pattern (follow your manual’s “broom pattern” procedure).
Verify the skirts are intact and close enough to contain debris.
Symptom: broom not spinning or spins intermittently
Likely causes
Drive belt loose/worn
Debris (tape, string) wrapped around brush rollers
Mechanical drive issue
Checks
Look for tangled debris first.
Inspect belt condition and tension.
Hopper and debris-handling failures (where outdoor sweepers get punished)
Parking lots and yards produce debris that behaves badly:
Wet leaves mat into screens.
Sand and fine dust loads filters quickly.
Gravel and fasteners can damage brooms and stress the vacuum path.
Symptom: frequent clogs, especially after rain or leaf season
Likely causes
Hopper screen not being cleaned often enough
Wet debris compacting inside hoses or corners
Operational fix
Increase screen-cleaning frequency during wet/debris-heavy periods.
Adjust cleaning routes and speed: slower passes through heavy debris reduce overload.
Symptom: rust, sticky doors, or poor sealing
Likely causes
Hopper not emptied at end of shift
Outdoor storage without drying/cleaning
Operational fix
Make “empty + clean + dry” part of shutdown.
Drive and power issues: solve the basics before you assume a major failure
Ride-on sweepers tend to fail in simple ways: loose connections, tripped breakers, poor charging habits, or belt issues.
Symptom: sweeper won’t power on
Checks
Battery charge status (and charger indicators)
Battery terminals and cables (tight, clean, no corrosion)
Circuit breaker/fuse status (reset only if safe and per manual)
Symptom: machine drives weakly or inconsistently
Likely causes
Drive belt issue
Mechanical drag (debris entanglement)
Electrical supply inconsistency
Checks
Inspect for entangled debris.
Inspect belts and obvious mechanical damage.
If the issue is intermittent, suspect a connection or sensor rather than a “hard” mechanical failure.
When to stop troubleshooting and call service
A good rule is: if it involves high-energy systems or rotating assemblies and you can’t verify safe isolation, stop. Specifically:
Persistent or increasing vibration (impeller/fan risk)
Burning smell, melted insulation, or repeated breaker trips
Hydraulic leaks (if applicable) or any leak near hot surfaces
Structural damage to hopper or sweeping head assemblies
Also stop if dust control issues persist after you’ve verified basic airflow (screen/filter seating, obvious hose leaks). At that point you’re likely into model-specific diagnostics.
Buyer-side checklist: maintenance questions to ask before you buy
Because you’re in consideration mode, here are practical questions that reduce “surprises” after purchase:
How long does a routine filter clean or swap take? (And is it tool-less?)
How accessible are brooms and skirts? Can one tech adjust/replace quickly?
What are the typical consumables? (filters, skirts, brooms, belts)
What’s the recommended PM schedule and what’s considered “operator maintenance” vs “service-only”?
Parts and service model: local stock, lead times, and whether critical parts are standard or proprietary.
Documentation quality: do you get a real troubleshooting guide and parts breakdown?
A simple test: ask for the troubleshooting document during evaluation. If it’s vague, hard to follow, or missing common symptoms, you’re likely buying future downtime.
FAQ
How often should you clean the hopper on a parking lot sweeper?
Daily is the safest baseline—especially in dusty or debris-heavy areas—because a full or dirty hopper can restrict airflow and make dust control worse. Schwarze recommends daily hopper cleaning as a core habit in its maintenance guidance.
Why is my ride-on sweeper leaving dust behind?
Most of the time it’s an airflow issue: clogged filters/screens, leaking seals/skirts, or a blockage in the vacuum path. Start with the hopper screen and filter seating/condition before deeper diagnostics.
What causes a broom to stop spinning?
Common causes are belt tension/wear or debris tangled around the brush rollers. If the broom is free to rotate but doesn’t drive under load, inspect the belt and drive components.
Is troubleshooting guidance transferable across models?
At the level of symptoms and checks (airflow restrictions, seal leaks, belt/brush inspection), yes. But service intervals and part specifications should always be taken from your model’s operator manual.